 播面
播面 如何在 SwiftUI 中实现网格布局(LazyVGrid / LazyHGrid)?
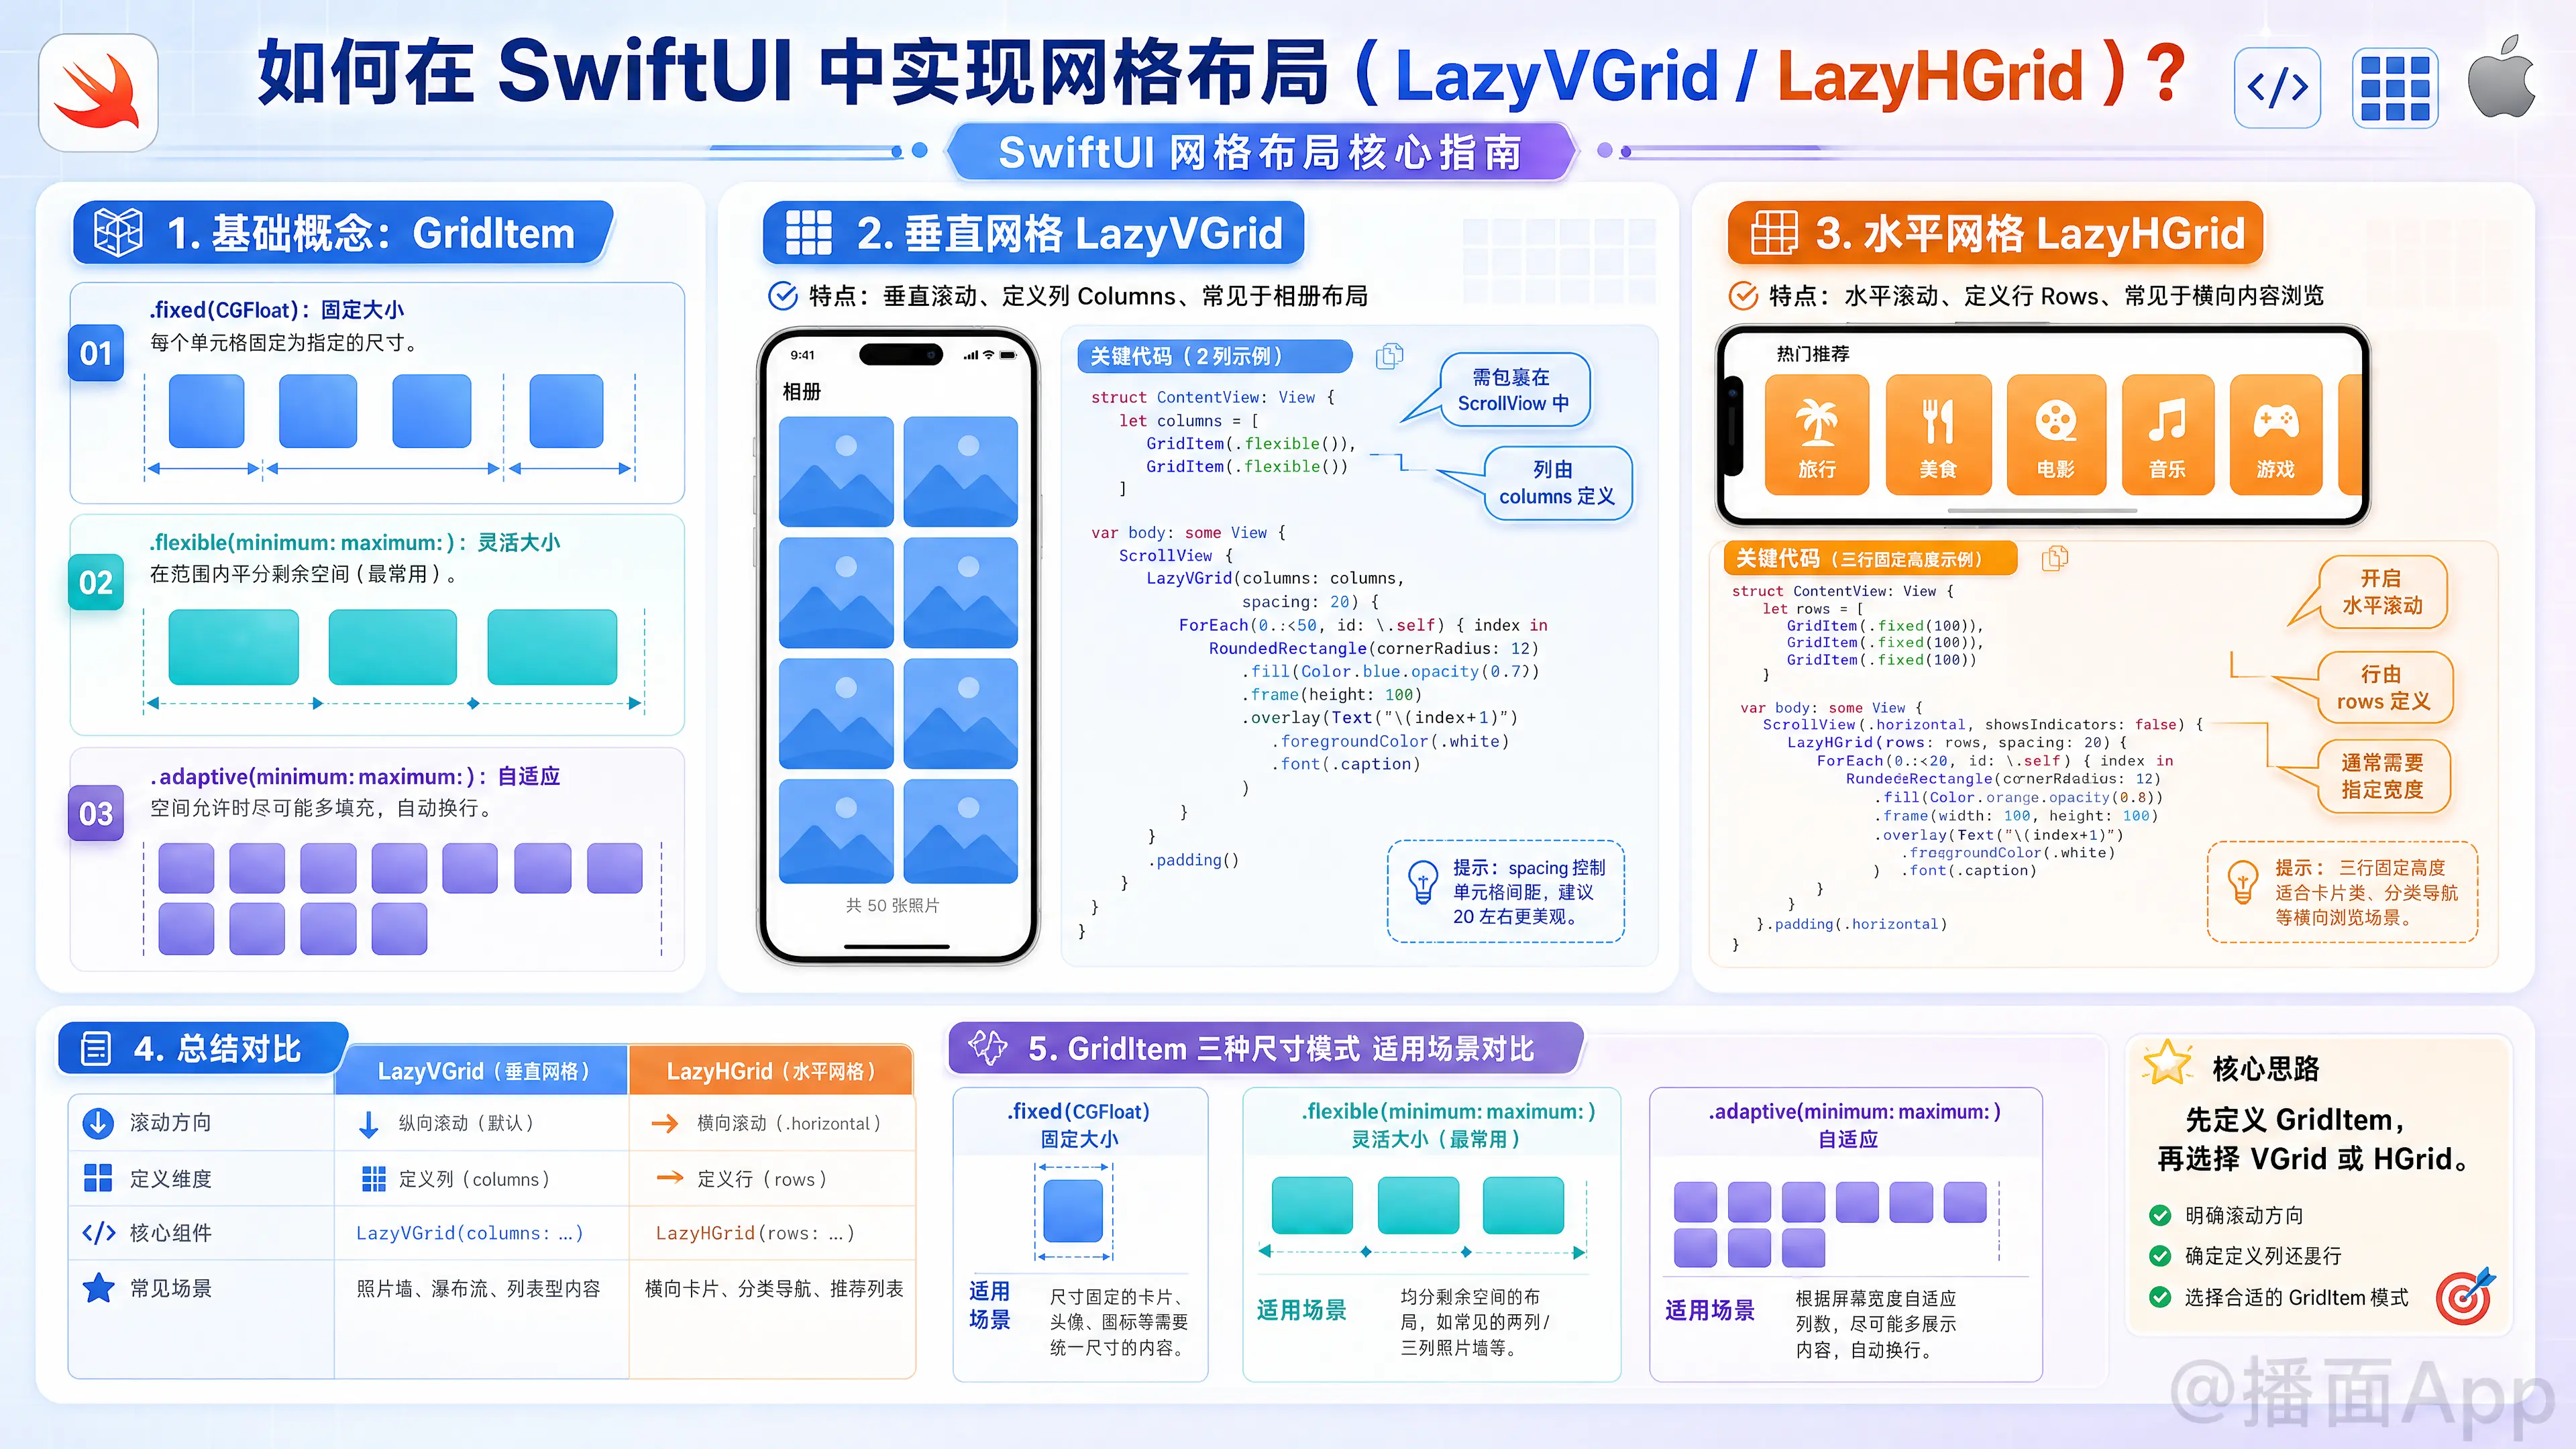
在 SwiftUI 中,实现网格布局主要使用 LazyVGrid(垂直滚动网格)和 LazyHGrid(水平滚动网格)。
这两个视图的核心在于配置 GridItem,它决定了网格的列数(对于 VGrid)或行数(对于 HGrid)以及它们的大小行为。
以下是详细的实现指南:
1. 基础概念:GridItem
在创建网格之前,你需要定义布局的规则。这是通过 GridItem 数组来实现的。
GridItem 有三种尺寸模式:
.fixed(CGFloat): 固定大小。.flexible(minimum: CGFloat, maximum: CGFloat): 灵活大小,平分剩余空间(最常用)。.adaptive(minimum: CGFloat, maximum: CGFloat): 自适应,在空间允许的情况下尽可能多地填充项目。
2. 垂直网格 (LazyVGrid)
这是最常见的布局(类似 iOS 的相册)。你需要定义列(Columns)。
示例代码:固定列数(例如 3 列)
plaintext
import SwiftUI

struct VerticalGridExample: View {
    // 定义两列,每列都是灵活宽度
    let columns = [
        GridItem(.flexible()),
        GridItem(.flexible())
    ]

    var body: some View {
        ScrollView { // 必须包裹在 ScrollView 中才能滚动
            LazyVGrid(columns: columns, spacing: 20) {
                ForEach(0..<50) { index in
                    RoundedRectangle(cornerRadius: 10)
                        .fill(Color.blue)
                        .frame(height: 100)
                        .overlay(Text("Item \(index)").foregroundColor(.white))
                }
            }
            .padding()
        }
    }
}
3. 水平网格 (LazyHGrid)
如果你想要横向滚动的网格,使用 LazyHGrid。你需要定义行(Rows)。
示例代码:固定行数
plaintext
struct HorizontalGridExample: View {
    // 定义三行固定高度
    let rows = [
        GridItem(.fixed(100)),
        GridItem(.fixed(100)),
        GridItem(.fixed(100))
    ]

    var body: some View {
        ScrollView(.horizontal) { // 开启水平滚动
            LazyHGrid(rows: rows, spacing: 20) {
                ForEach(0..<50) { index in
                    RoundedRectangle(cornerRadius: 10)
                        .fill(Color.orange)
                        .frame(width: 100) // 这里通常需要指定宽度
                        .overlay(Text("\(index)").foregroundColor(.white))
                }
            }
            .padding()
        }
        .frame(height: 350) // 限制 ScrollView 的高度
    }
}
4. 进阶:GridItem 的三种模式详解
理解这三种模式对于适配不同屏幕(iPhone vs iPad)至关重要。
A. .flexible() (平分空间)
如果你想要固定的列数(例如永远是 3 列),但宽度随屏幕变宽而变宽:
plaintext
let columns = [
    GridItem(.flexible()),
    GridItem(.flexible()),
    GridItem(.flexible())
]
// 结果:屏幕多宽,这3列就平分多少空间。
B. .adaptive(minimum: ...) (响应式布局 - 推荐)
这是最强大的模式。你不需要指定列数,只需指定最小宽度。系统会自动计算一行能放下多少个。
- iPhone 上可能显示 3 列。
- iPad 上可能显示 6 列。
plaintext
struct AdaptiveGridExample: View {
    // 只要空间允许,每个格子至少 100pt 宽
    let columns = [
        GridItem(.adaptive(minimum: 100))
    ]

    var body: some View {
        ScrollView {
            LazyVGrid(columns: columns, spacing: 20) {
                ForEach(0..<20) { index in
                    Color.purple
                        .frame(height: 100)
                        .cornerRadius(8)
                }
            }
            .padding()
        }
    }
}
C. .fixed(...) (混合布局)
你可以混合使用。例如,第一列固定宽度,第二列占满剩余空间:
plaintext
let columns = [
    GridItem(.fixed(100)), // 左侧固定 100
    GridItem(.flexible())  // 右侧填满剩余
]
5. 添加 Section 和 吸顶标题 (Pinned Views)
LazyVGrid 支持分组(Section)以及让标题吸附在顶部。
plaintext
struct PinnedHeaderGrid: View {
    let columns = [GridItem(.adaptive(minimum: 100))]

    // 模拟数据
    let sections = ["Section 1", "Section 2", "Section 3"]

    var body: some View {
        ScrollView {
            // pinnedViews: [.sectionHeaders] 让标题吸顶
            LazyVGrid(columns: columns, spacing: 20, pinnedViews: [.sectionHeaders]) {

                ForEach(sections, id: \.self) { sectionName in
                    Section(header: HeaderView(title: sectionName)) {
                        ForEach(0..<10) { i in
                            Color.green
                                .frame(height: 80)
                                .cornerRadius(5)
                        }
                    }
                }
            }
        }
    }
}

// 自定义 Header 视图
struct HeaderView: View {
    let title: String
    var body: some View {
        Text(title)
            .font(.title)
            .bold()
            .frame(maxWidth: .infinity, alignment: .leading)
            .padding()
            .background(Color.white.opacity(0.9)) // 背景色防止内容透视
    }
}
总结
- 垂直滚动:用
ScrollView+LazyVGrid,定义columns。 - 水平滚动:用
ScrollView(.horizontal)+LazyHGrid,定义rows。 - 响应式设计:首选
GridItem(.adaptive(minimum: ...)),它能自动适配不同宽度的屏幕。 - 性能:因为是 "Lazy"(懒加载),它们只渲染屏幕上可见的视图,所以处理成百上千的数据也没问题。