Go context 是如何实现取消(Cancel)和超时(Timeout)控制的?
Go context 包的核心机制是基于 通道(Channel) 和 树状结构(Parent-Child Tree) 的信号传播。
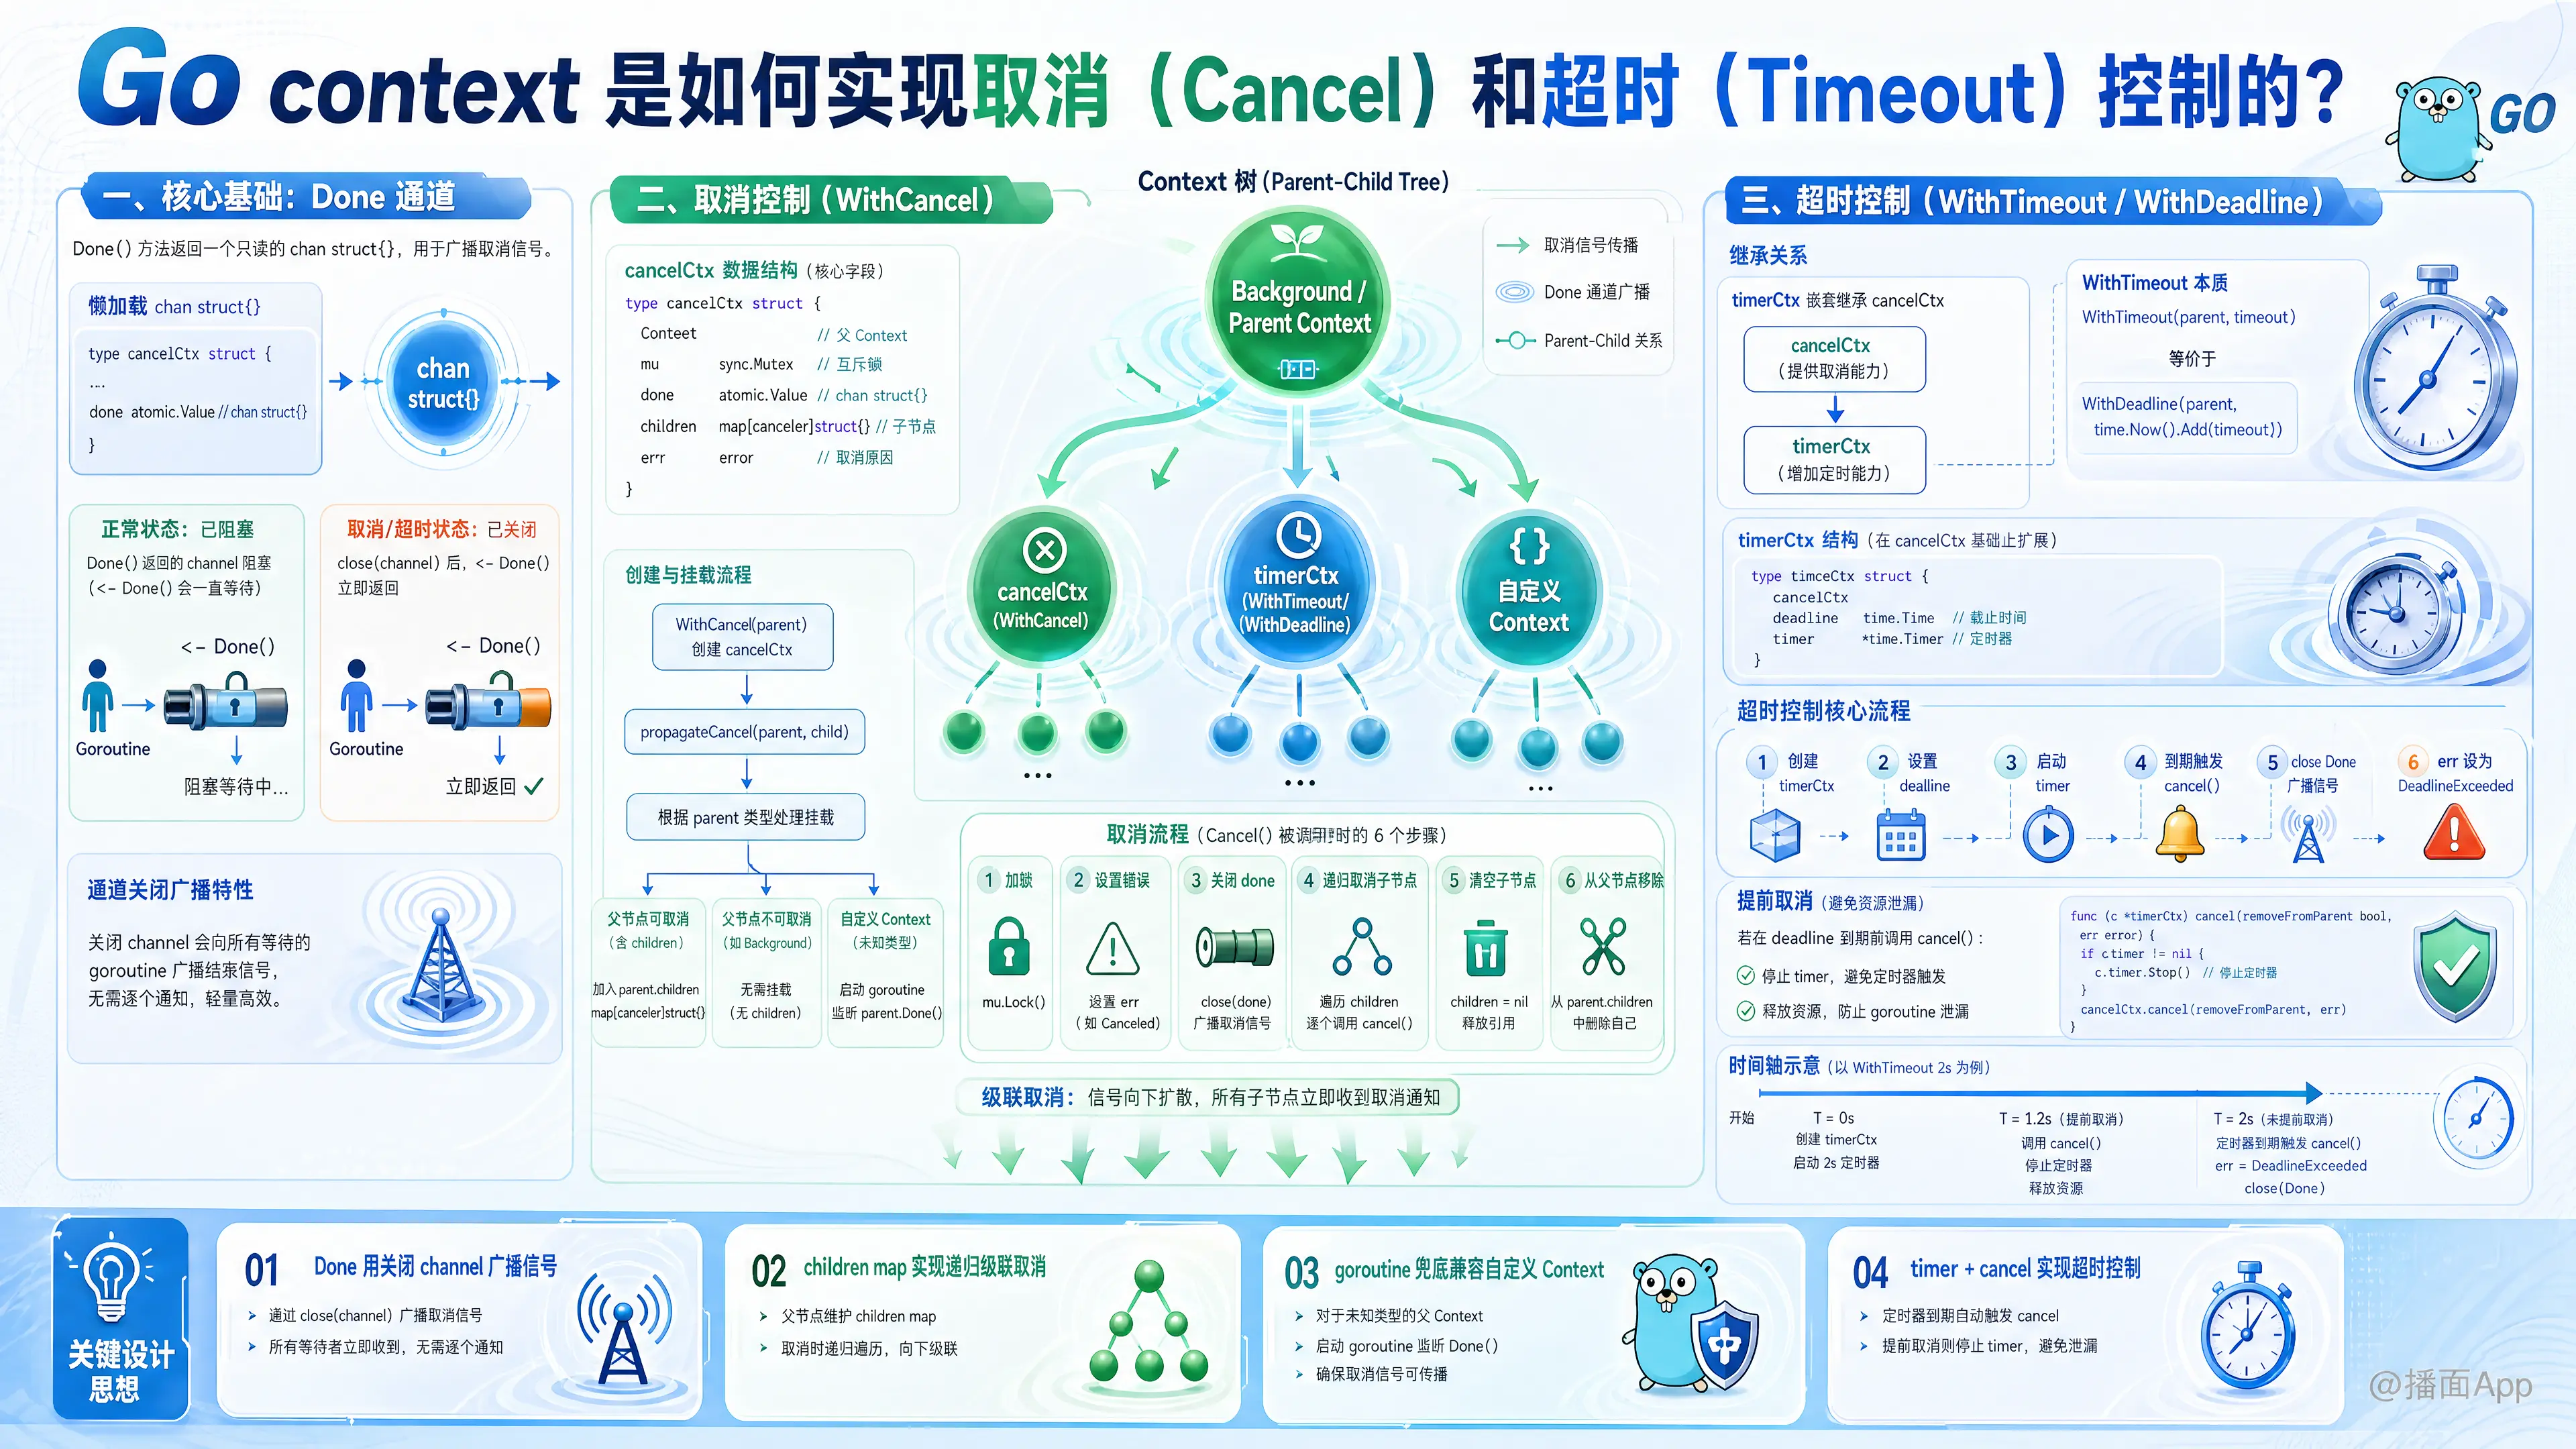
简单来说,context 构建了一棵树,当父节点被取消时,它会递归地关闭所有子节点的 Done 通道,从而实现级联取消。
下面深入源码逻辑(基于 Go 1.20+ 版本逻辑),详细解析 取消(Cancel) 和 超时(Timeout) 的实现原理。
一、 核心基础:Done 通道
无论是取消还是超时,最终表现给用户的接口都是 ctx.Done()。context 内部维护了一个懒加载的 chan struct{}。
- 正常状态:
Done()返回的 channel 是阻塞的。 - 取消/超时状态:内部会
close(channel)。根据 Go 的 channel 特性,读一个已关闭的 channel 会立即返回零值,不再阻塞。
二、 取消控制 (WithCancel) 的实现原理
WithCancel 返回一个 cancelCtx 结构体。它的核心逻辑在于父子关系的建立和信号的向下传播。
1. 数据结构 (cancelCtx)
type cancelCtx struct {
    Context              // 嵌入父 Context
    mu       sync.Mutex  // 保护字段的互斥锁
    done     atomic.Value // 懒加载的 chan struct{}
    children map[canceler]struct{} // 关键:存储所有子节点,用于级联取消
    err      error       // 存储取消原因(Canceled 或 DeadlineExceeded)
}
2. 建立父子关系 (propagateCancel)
当你调用 context.WithCancel(parent) 时,Go 会执行 propagateCancel 函数,试图将新的子 Context "挂载" 到父 Context 上。
- 如果父节点也是可取消的(标准库的
cancelCtx):
子节点会将自己加入到父节点的childrenmap 中 (parent.children[child] = struct{}{})。- 目的:当父节点取消时,可以通过遍历 map 找到并取消所有子节点。
- 如果父节点是不可取消的(如
Background):
不需要挂载,因为根节点永远不会取消。 - 如果父节点是自定义 Context(无法直接访问 map):
Go 会启动一个新的 Goroutine 来监听父节点的Done()。一旦父节点 Done,该 Goroutine 会调用子节点的cancel。
3. 取消操作 (cancel 函数)
当你调用返回的 cancel() 函数时,内部发生了以下步骤:
- 加锁:获取
mu锁。 - 设置错误:将
err字段设置为context.Canceled。 - 关闭通道:关闭内部的
donechannel(通知监听该 Context 的 Goroutine)。 - 递归取消子节点:遍历
childrenmap,依次调用所有子节点的cancel方法(实现了取消信号的向下传播)。 - 移除引用:将
childrenmap 置空(帮助 GC)。 - 脱离父节点:将自己从父节点的
childrenmap 中移除(防止父节点重复取消已取消的子节点,避免内存泄漏)。
三、 超时控制 (WithTimeout / WithDeadline) 的实现原理
WithTimeout 实际上是 WithDeadline 的语法糖(当前时间 + duration)。它们返回的是 timerCtx。
1. 数据结构 (timerCtx)
timerCtx 继承自 cancelCtx,它拥有 cancelCtx 的所有能力,并多了一个定时器。
type timerCtx struct {
    cancelCtx // 继承取消能力
    timer *time.Timer // 核心:标准库的定时器
    deadline time.Time
}
2. 实现逻辑
当你调用 context.WithDeadline(parent, d) 时:
检查父节点 Deadline:
如果父节点的截止时间早于当前设定的时间,那么子节点其实不需要定时器,直接依赖父节点的取消信号即可(退化为WithCancel)。创建定时器:
如果需要自己控制超时,创建一个time.Timer。goc.timer = time.AfterFunc(d.Sub(time.Now()), func() { c.cancel(true, DeadlineExceeded) })- 关键点:
time.AfterFunc会在时间由于时执行一个回调函数。 - 回调内容:调用
c.cancel,并传入错误context.DeadlineExceeded。
- 关键点:
触发超时:
当时间到了,Timer 触发回调 -> 调用cancel-> 关闭done通道 -> 传播给子节点。手动取消:
如果在超时之前任务完成了,用户调用了cancel(),timerCtx会重写cancel方法:- 先调用内部
cancelCtx的取消逻辑(关闭通道、取消子节点)。 - 停止定时器:
c.timer.Stop()。这是为了释放 timer 资源,防止内存泄漏。
- 先调用内部
四、 总结流程图
1. 取消 (cancel()) 的传播流
[Parent Context]
      |
      +--- (Parent 被 Cancel)
      |         |
      |         v
      |    1. Parent 关闭自己的 Done Channel
      |    2. Parent 遍历 children map
      |         |
      |         +---> [Child 1].cancel() -> 关闭 Child 1 Done -> 遍历 Child 1 children...
      |         |
      |         +---> [Child 2].cancel() -> 关闭 Child 2 Done -> ...
2. 超时 (WithTimeout) 的触发流
[timerCtx]
    |
    +--- 创建时启动 time.Timer
    |
    +--- (时间到了) -> Timer 触发回调
            |
            v
         调用 self.cancel()
            |
            v
         1. 关闭 Done Channel (返回 DeadlineExceeded)
         2. 取消所有子节点 (传递取消信号)
五、 关键点总结
- 级联取消:通过
childrenmap 维护树状结构,父死子必死。 - 线程安全:内部使用
sync.Mutex保证并发调用cancel是安全的。 - 懒加载:
Donechannel 只有在第一次被调用时才会创建(优化性能)。 - 资源清理:
WithCancel:子节点取消时会将自己从父节点 map 中移除。WithTimeout:务必在使用完后调用cancel(),否则在超时发生前,内部的 Timer 不会被回收,导致轻微的内存泄漏。